Standard and Public File Sharing
Windows
Server 2008 supports two types of file sharing, referred to as public file
sharing and standard file sharing.
In
the case of public file sharing any files to be shared must be copied to the
server's Public folder located at
%SystemDrive%\Users\Public. Once placed in this folder the files are accessible
to any users logged locally onto the machine and, if enabled, to any network
users. Public sharing provides some control over access to the files. For
example, when the server belongs to a workgroup the public folder can be
password protected. In addition, network access to files within the public
folder can be restricted to reading and executing only or given permission to
read, write, create and delete files.
Standard
file sharing, which is only permitted on NTFS volumes, allows individual
folders files and volumes to be shared to specific users. This provides far
greater levels of security over network access through a combination of NTFS file and
folder permissions and share permissions, and avoids
the necessity to move files from their existing location in order to share
them.
Enabling Windows Server 2008 File Sharing
File
sharing in Windows Server 2008 is managed from the Network and
Sharing Center, accessed by selecting Start ->
Network and clicking on the Network and Sharing
Center button in the toolbar. Once invoked, the Network and
Sharing Center will list the current file sharing configuration and options as
illustrated in the following figure:
To enable public file sharing, click on the down arrow next to the Public
folder sharing in the section entitled Sharing and discovery. This will provide the following list of public folder
sharing options:
§ Turn on sharing so anyone with network access can open
files - Allows network users to open, but not delete, modify or
create files in the server's public folder.
§ Turn on sharing so anyone with network access can open,
change and create files - Allows network users to open, modify, delete and create
files in the public folder.
§ Turn off sharing (people logged on to this computer can
still access this folder) - Allow public folder access only to those users locally
logged on to the server. Network users are denied access.
Similarly, standard
file sharing can be configured by click the down arrow next to File sharing. When unfolded, this panel provides the option to either
enable or disable standard file sharing on this server. When enabled, a dialog
will appear providing the option to make the shared folders available only to
the private network on which the system resides, or to make sharing available
to public networks. The choice here depends on the requirements of the
organization but for security purposes it is typically best to limit sharing to
the private network unless external access is required.
The Network and
Sharing Center also allows password access to shared folders to be
configured. When the arrow next to Password protected
sharing is selected the options to enable or disable password
protection sharing are provided. When enabled on workgroup servers, only users
with user accounts and passwords on the server will be able to access shared
files and folders.
Creating Shared Folders with Windows Explorer
Shared
folders can be configured using Windows Explorer, simply by navigating to the
folder to be shared, right clicking on the folder and selecting Properties from the
menu. In the properties dialog, click on the Sharing tab to
display and modify the current shared folder settings as illustrated in the
following figure:
Within
the sharing property panel, click on the Share... button to
access the File Sharing dialog. Within this
dialog, the users who may access this shared folder are specified. If file
sharing has been restricted to users with local accounts and passwords, a list
of users can be obtained by clicking on the down arrow. In this situation,
select and add users, or select Everyone if access is to be made
available to all users with local accounts:
Once these settings are complete, click on the Share button to
initiate the file sharing process. Once this initial phase of the share setup
is complete a dialog will appear announcing this fact, listing the full
Universal Naming Convention (UNC) path to the shared folder and providing the
option to email users to notify them of this fact:

Having specified which users will have access to the folder the next step is to
enable the sharing of the folder, specify share permissions and
configure a Share Name by which the folder will
be referenced and accessed. In addition caching of shared files can be
configured. Caching allows users to maintain local copies of shared files so
that they can be accessed off-line(for example
when the server hosting the files is not available to the user's local system).
With caching configured, local copies of shared files are stored on the user's
local system so that they can be accessed without a connection to the server.
When a connection is re-established, any changes made to the local copy of the
file are synchronized with the original copy on the server.
To
configure these settings, click on the Advanced Sharing button to
display the following dialog:
In this dialog, set the Share this folder option to enable the
sharing of the folder. Once this has been selected the Share name field and
associated button will activate enabling a share name to be entered. By default
the name of the folder being shared will be displayed, although this may be
changed to another name if desired. If the number of concurrent users accessing
a shared folder is of concern, modify the number of simultaneous users
accordingly. Enter optional comments about the share before clicking on Caching to configure
the off-line file settings. This will
invoke the Offline Settings dialog where a number of
options are available including allowing each user to specify which files they
would like to be able to access off-line, only having files that users actually
access available off-line and disabling off-line sharing all together:
The final step in the folder sharing setup is to click on Permissions to configure
the share permissions, details of
which are covered in a later section of this chapter.
Creating Shared Folders on Remote Servers with Computer
Management
Windows
Explorer provides an excellent mechanism for configuring shares on the local
system. This approach falls a little short in terms of convenience, however,
when it is necessary to configure shares on a remote server. Fortunately
Windows Server 2008 addresses this need by allowing shares to be configured
from the Computer Management tool. One point to note
is that while this section will focus on the remote configuration of file
shares, the steps outlined here may equally be used to share files on a local
server. In fact, the Create a Shared Folder Wizard can be
invoked on a local machine either from Computer Management or by
entering shrpubw at the command prompt or
in a Run dialog.
After
starting Computer Management on the local system, right click on Computer
Management in the left panel tree and select Connect to
another computer... In the resulting dialog box either enter the name of the
remote computer or click on Browse and then Advanced... to search
the network or domain for the remote system. Once a connection has been
established to the remote server the Computer Management interface will refresh
and the Computer Management link in the tree will
also display the name of the selected remote server.
Once
Computer Management is configured to administer a remote server, the next step
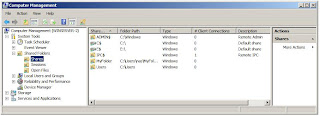
is to begin the folder sharing process. Begin by unfolding the System Tools, then Shared Foldersbranches of
the tree in the left panel. Select Shares to obtain a
list of current shares configured on the remote system. The following figure
illustrates Computer Management with a list of shares configured on a remote
system named WINSERVER-2:
The creation of a new shared folder on the remote server (although as
previously mentioned this can also be used on local computers) involves the use
of something called the Create A Shared Folder Wizard, which, as the name suggests provides a user friendly
way of configuring shared folders. To invoke this wizard, simply right click on New Share..., then click on Nexton the wizard's welcome screen. In the resulting Folder Path screen,
either type in the path of the folder to be shared, or browse the file systems
to locate it. With the required folder path selected click on Next to configure
the name and description settings. On this screen, specify the share name by
which the folder will be accessed from remote computers together with an
optional description of the shared folder. Next, configure the off-line file
settings for the folder contents by clicking on Change.
Once
these settings are configured, click on Next once again
to configure the share permissions for the selected folder.
Either select one of the pre-configured options or select Customize
permissions and click on Custom to configure
share permissions on a per user basis.
Finally,
click on finish to complete the sharing process. If the configuration is
successful a summary screen similar to the one illustration in the following
figure will be displayed:
By
default, shared folders are listed when users browse for shared resources. From
time to time, however, it may be necessary to share a folder but have it hidden
such that only users who know of its existence can access it by referencing the
share name. This concept is known as hidden share access. The most important point to note about hidden shares is
that it does nothing to prevent access other than hiding the fact that the
share exists. If, for example, a user learns of the existence of a hidden share
(perhaps because another user tells them about it), and the share permissions
are such that they have access to the folder, the fact that it is hidden will
do nothing to keep the user out of that folder.
Shares
are made hidden by placing a $ at the end of the share name. For example, to
hide a share located at C:\accounts simply give it a share name with a trailing
$, such as accounts$.
Understanding and Configuring Share Permissions
As
outlined at the beginning of this chapter, Windows Server 2008 provides two
levels of permissions for shared files and folders, namely share
permissions and file and folder permissions. Share permissions are applied when access is made via
the network. When shared files and folders are accessed locally from the server
on which they reside these permissions serve no purpose. File and folder
permissions, on the other hand, take effect both when accessing files and
folders both locally and over the network. In the case of network access to
shared files and folders, the shared permissions are applied first, followed by
any file and folder permissions. The key issue to note is that file and folder
permissions provide a far greater level of control over access than the more
general permissions options provided by share permissions. In this section,
share permissions will be covered. For details on file and folder permissions
refer to the chapter entitled Understanding
Windows Server 2008 File and Folder Ownership and Permissions.
Share
permissions are granted on a per user and per group basis. In addition to
allowing a cap on the number of concurrent users accessing a share to be
defined, share permissions also provide three permission options, each of which
can be set to Allow or Deny:
§ Full Control - Grants the specified
users permission to change file and folder permissions, execute, read, modify,
create and delete files and sub-folders.
§ Change - Grants users
permission to change file and folder attributes, read, modify, execute, create
and delete files and sub folders.
§ Read - Grants users permission to read and execute files and
view and access file lists and sub-folders.
Permissions
are cumulative in that a user will inherit the permissions of all the groups of
which he or she is a member. If a permission is Denied, however, it overrides any cases where that permission
may have been granted. For example, if a user is a member of a group where full
control is provided over a folder, and also a member of a second group where
full control is specifically denied, the user will be denied full control
regardless of the fact that it was granted in the first group.
To
configure share permissions, start Computer Management, connect to a remote
server if not working on local shares, unfold System Tools and select Shares to list all
currently shared folders. To configure share permissions for a folder, select
it from the list, right click and select Properties. In the properties dialog select the Share
Permissions tab as illustrated in the following figure:
This screen displays the current share permissions and provides the ability to
configure additional permission controls. To change the settings for a currently
configured group or user select the user from the list, modify the permissions
accordingly and click on Apply to commit the changes.
To
add permissions for a specific user or group click the Add button and
enter one or more users or groups into the text box (separating multiple
entries with a semi-colon) and click onCheck Names to verify
the names are correct. Click on OK to return to the properties dialog where the added users
and groups will appear in the list. Once again, select each name in turn and
configure the desired share permissions. Finally, click Apply to commit
the new permissions.


